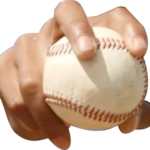
Gripping the Ball and Ball Leaving Hand
Gripping the Ball (4-Seam Grip)
Brief Description
The 4-Seam Grip is the best ball grip for throwing a baseball straight. It is called the 4-seam grip because when the ball is thrown you see four different seams rotating (backwards towards thrower).
Mechanics
- Grip the ball across the seams with the index and middle fingers on top, the thumb on the bottom, and the other fingers to the side.
- For younger players with smaller hands, add the ring finger to the top set.
- Make sure there is a little bit of space between the palm of the hand and the baseball. The larger the hand, the larger the space.
- Don’t hold the ball too tight that you hold onto it too long or too softly that it slips out of your hand. Think of holding a bird—hold it tight enough to not let the bird fly away, but not too tight to injure the bird.
- The ball comes off the tips of the fingers and rotates in a backward motion (turning backwards towards the thrower) with four seams rotating horizontally.
Videos
Gripping the Ball (Baseball Factory) ![]()
How To Create A “4-Seam” Throwing Grip (Winning Baseball) ![]()
Sources: Baseball Factory and Steve Bernhardt, Trent Mongero, Winning Baseball
Drills
Throwing Mechanics
Throwing Mechanics
Brief Description
This skill is about developing the correct path for the arm when throwing the ball. It focuses on the start and backswing of the throw.
Remember that young players have developed different ways to throw and teaching them the proper way will take time.
Mechanics
- Grip the ball with four-seam grip.
- Get into stretch position with ball in glove at chest level and feet in line with direction of throw.
- Optional. Bring throwing arm down and front leg up and motion to crack egg on top of front leg thigh.
- Continue with downward motion of arm and thumb going past the outside thigh. This is the “thumb to thigh” part.
- Bring arm around the circle and up and when arm is at 90 degrees the ball should be facing out and behind the thrower at 45 degree angle. This is the “show ball to sky” part.
- At the same time the throwing hand is moving in a circle down and out, the glove arm is moving down and forward to provide balance and rhythm. In other words, it is not just about the throwing arm. The glove arm movement needs to provide balance to the throw.
- Weight also has to be balanced in the centre of the body. At the show ball to sky part, the arms (shoulders to elbows) and body form a T-shape.
- The ball arm then needs to come forward and accelerate through the throw and move across and down the side of the forward leg.
Videos
Throwing Mechanics (Baseball Factory) (2 min) ![]()
Arm Path When Throwing (Baseball Factory) (2 min) ![]()
Throw Like a Pro! Step-by-Step Mechanics (Winning Baseball) (15 min) ![]()
Sources: Baseball Factory and Steve Bernhardt, Trent Mongero, Winning Baseball


