
Bat Grip -> Stance -> Load and Stride -> Hip Rotation -> Contact -> Extension and Finish
Bunting
Videos Only 
Gripping the Bat (Baseball Factory) (2 min.) ![]()
Stance and Grip (ABCA) (3 min.) ![]()
Stance (Winning Baseball) (3 min.) ![]()
Swing (ABCA) (4 min.) ![]()
Load and Stride (Winning Baseball) (6 min.) ![]()
Hip Rotation (Winning Baseball) (5 min.) ![]()
Contact (Winning Baseball) (8 min.) ![]()
Extension and Finish (Winning Baseball) (2 min.) ![]()
Bunting Winning Baseball (9 min) ![]()
Common Hitting Flaws and Drills (Virginia Baseball Club) ![]()
Bat Grip
Most batters should grip the bat with the calloused areas where the fingers join the hands. This somewhat aligns the middle knuckles of each hand. When the index fingers are lifted up while holding the bat, they should point in the same direction (parallel to each other).
Video: Gripping the Bat (Baseball Factory) (2 min.) ![]()
Source: Baseball Factory with Steve Berhardt
The Stance
Video: Stance and Grip (ABCA) (3 min.) ![]()
Source: Baseball Skills and Drills, American Baseball Coaches Association
Video: Stance (Winning Baseball) (3 min.) ![]()
Source: Trent Mongero, Winning Baseball
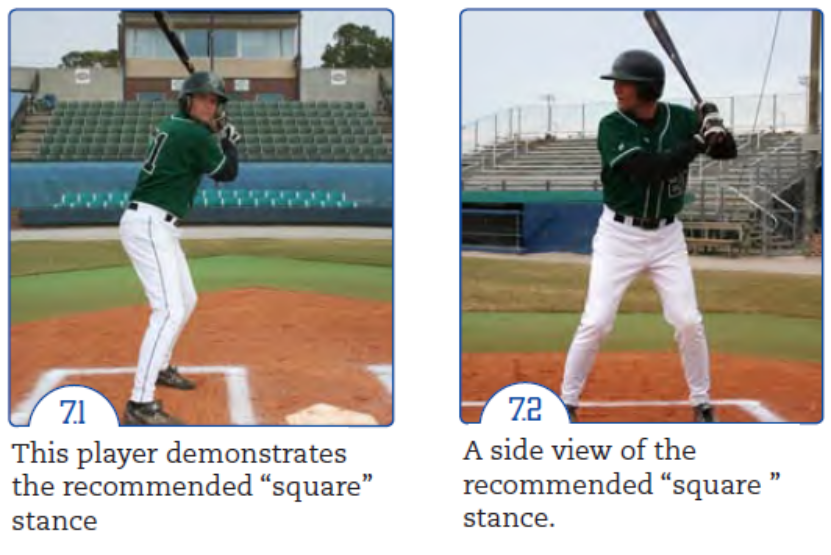
Checklist for the Stance
Bottom Half
- Feet are slightly wider than shoulder width.
- Weight is on the balls of the feet and should feel light on your feet.
- Back foot is pointed slightly in (pigeon-toed) to ensure that the player’s weight is on the balls of the feet and to make for an easier rotation of the back knee and hip as the body rotates around.
- Knees are slightly bent.
- Waist is bent slightly forward.
- Approximately 60 percent of the weight is on the ball of the back foot.
Top Half
- Shoulders are level, or the front shoulder is down slightly.
- Front arm is down with the elbow bent at a 90-degree angle.
- Back elbow is down.
- Bat angle should not be extreme (i.e., pointed up, flat, wrapped behind hitter’s head) as the goal is to take a short, compact swing to the ball and extreme bat angles lengthen a swing.
- Hands are six to eight inches away from the back shoulder and at the top of the strike zone.
- Head is straight up so the hitter can see the pitcher with his front eye closed.
- The body is properly stacked, one part on top of the next part in balance.
Potential Flaws with Stance
- Muscles are tight and tight muscles are slow muscles.
- Setting up too far or too close to plate will cause poor plate coverage and flaws in the swing.
- Front shoulder is closed (i.e., turned in) which turns his head away from the pitcher. This blocks the distant eye from seeing the pitch which can significantly affect his depth perception and ability to hit the ball.
- A hitter should not attempt to match his stance to that of a favourite professional player just to look good. Stance adjustments should have a purpose and increase the player’s odds for success.
Secrets of a Good Stance
- Establish a routine when getting into the batter’s box to hit. Routines provide an element of comfort and familiarity, and this increases a player’s confidence. For example, bring the back foot in first and get a good foot plant. Another example is to rest the bat on the shoulder while setting the grip on the bat.
- Create a gentle rhythm or add slight movement to the batting stance. It is easier for a player to start his swing if his body is already in motion instead of frozen in a static stance.
- Stand in the back of the batter’s box to allow more time for pitch recognition or to judge the speed and location of the pitch.
High Back Elbow?
Many coaches teach a high back elbow so that the swing will produce fewer fly balls and more ground balls. Although this positioning usually works, it is not because of the high back elbow. It is a result of the front shoulder dropping down when the back elbow is raised. A hitter can and should keep the front shoulder down without raising the back elbow. He must drop a high back elbow as the swing begins, which takes time and can cause a late bat.
Load and Stride
Video: Swing (ABCA) (4 min.) ![]()
Source: Baseball Skills and Drills, American Baseball Coaches Association
Video: Load and Stride (Winning Baseball) (6 min.) ![]()
Source: Trent Mongero, Winning Baseball
The basic law in the power skills of throwing and hitting are that the player stays behind the final summation of the forces he is trying to generate until he reaches the final stage of the release of energy. He must not leak, jump, lunge, shift or transfer weight before that time.
The load is the movement back to the launch position. The launch position is the point in the swing where the player generates all movement forward to hit the ball.
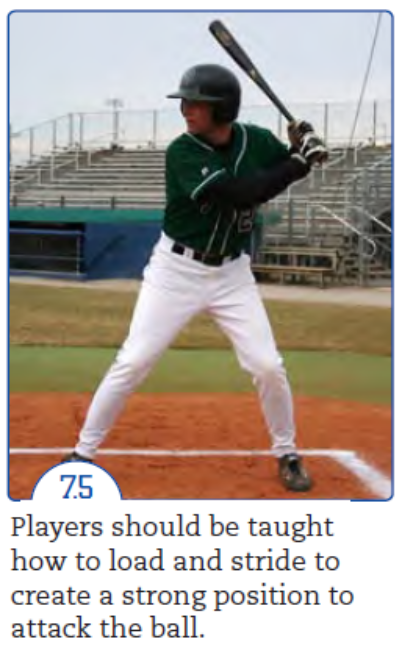

Checklist for the Load
- Front knee is bent in slightly.
- Approximately 10 percent more weight is transferred to the inside of the ball of the back foot.
- Back knee is still above or inside the back foot.
- Shoulders can rotate slightly inward.
- Front arm goes back slightly but remains close to a 90-degree angle at the elbow.
- Bat remains close to its original position. The bat head does not wrap around the player’s head, as that movement will significantly increase the distance the bat must travel to get to the ball.
- Hands move back slightly but do not drop below their original position in the stance. When they drop, the motion is called a hitch, which often causes a late swing.
- At the completion of the load (i.e., the launch position), the player should be able to shut his front eye and still see the pitcher.
Stride
The stride occurs as the pitch is delivered. It should follow immediately after the load has reached the launch position or at the same time.
Checklist for the Stride
- Stride is no more than six to eight inches and toward the pitcher.
- Stride is a soft step that takes a small transfer of weight from the back foot. The stride is soft to ensure the head doesn’t move abruptly.
- Stride lands on the big toe or ball of the foot.
- Head travels forward no more than an inch or two.
- The hands remain in the load position. A hitter will often let the hands leak forward, reducing his power.
- Check the stack (knees above the feet, chest above the knees, head above the chest) to make sure it is balanced.
Launch Position
A proper load should place the hitter in position to launch his energy forward.
The moment to hit has arrived. All movements before this time should be comfortable, effortless, and rhythmical. The hitter should use no force to create the load or the stride.
Hip Rotation
Video: Hip Rotation (Winning Baseball) (5 min.) ![]()
Source: Trent Mongero, Winning Baseball
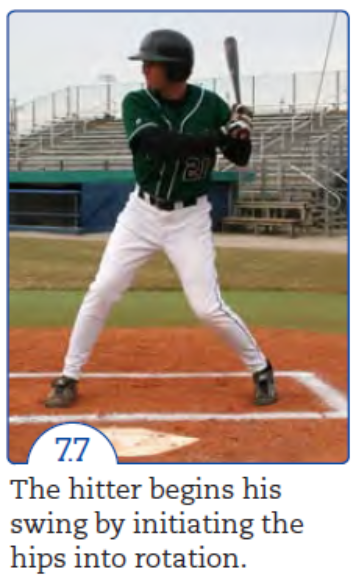


The movement forward to hit the ball starts with the hips. Rotate the back hip forward while pivoting on the ball of the back foot.
The Bug Analogy
An analogy may help the player learn this pivot. Ask the player to pretend that he has stepped on a bug with the ball of his back foot. The bug is in soft dirt, so he is undamaged but trapped. Now, if the hitter transfers his weight early or overstrides, the heel of the back foot will move upward so that only the toes are touching the ground. The bug can escape if this happens. The hitter much keep him trapped. The objective is to squash the bug by pivoting the foot forward with the weight staying directly over the ball of the foot where the bug is trapped.
Checklist for Hip Rotation
Start
- Front foot is now planted on the ground with heel down.
- Front leg is braced and firm.
- Back heel starts to lift up.
- Hip rotation is released by the pivot on the back foot (squash of bug). If the back foot does not rotate/pivot, the hitter will not have good hip rotation or proper balance.
- Back knee starts to dive in.
- Posture is good and weight is balanced.
- Belly button starts to move under the eyes.
- Hands work together to bring the knob of the bat towards the ball with the barrel up. Hands lag hips ever so slightly.
- Back elbow stays in and close to body to ensure hands stay inside of ball and is on the quickest path to ball.
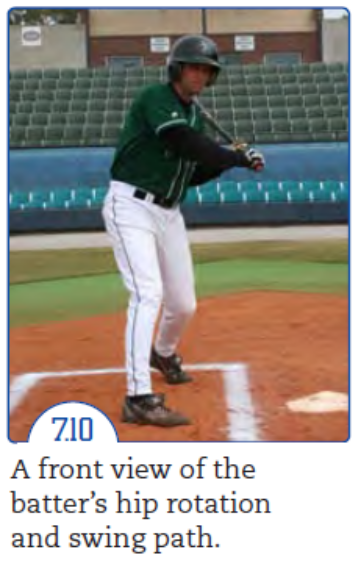
Middle to Contact
- Hips rotate farther on an inside pitch than on an outside pitch. Wherever the pitch is located, the back knee and belly button should face the direction the ball will travel off the bat.
- Hip rotation must not extend past the place where the bat will hit the ball. If it does, the force of the hips pulls energy away from maximum force on the ball. This action is called spinning.
- Hips rotate on a level plane. If the front side is higher than the back side, the back knee collapsed too much.
- Hitter retains body balance throughout the rotation. Often the weight falls toward the plate because of a poor pivot on the back side or a weight transfer outside the stack.
- Weight transfer is from back to middle. The back foot remains in solid contact with the ground. The hitter must not let the bug escape before he squashes it!
- Front knee should momentarily straighten as the hitter generates maximum bat speed at contact with the ball. To apply centrifugal force, a bracing off must occur.
- Hitter feels himself drive the front hip out of the way. The front hip does not pull the back hip forward.
Shoulder Rotation
The hip rotation will be followed in sequence by the abdomen, chest and shoulders. These areas will move naturally in response to what the hips are doing. Note that the front-side shoulder, like the front-side hip, will stay closed until the back shoulder forces it out. If the front shoulder is the force, it will drag the back shoulder forward. This action will not provide a quick, forceful swing. The hitter should use the front shoulder to point toward the ball until the back shoulder comes forward. If the hips are rotating on a level plane, it follows the shoulders will rotate on a level plane. Any sequence in movement that rotates at a different angle than the previous motion will disrupt the generation of force, which will reduce power and quickness.
Weight Transfer
The hitter must not allow the weight to transfer so much that he loses his solid base with the back foot. He should remember that he is squashing a bug. The ball of the back foot must remain solidly on the ground. If the back foot comes off the ground or drags forward as the hitter makes contact, he has shifted too much weight and lost the power base. The power base stays in balance throughout the swing. This means that the knees and body weight stay inside the base (feet).
Also the weight transfer should move from back to the middle of the body—not from back to front.
Bat Arc
If the hitter has rotated the body in proper sequence and the forward direction of force from the knees to the hips to the shoulder is in a level plane to the ground, the bat arc should be in the same plane and a level swing should occur.
The hands always should stay higher than the path of the ball as the hitter approaches the ball. He must not drop the hands to the path of the ball as he begins his approach. Doing so takes time, causes fly balls, and reduces power and quickness.
The hands should stay inside the path of the ball, close to the power stance. The farther the hands are from the body, the longer, slower, and weaker the swing will be. If the hitter holds the hands away from the body, contact will often occur on the outside of the ball, resulting in a hooking spin that will reduce the distance that the ball will travel. Ultimately, the hitter wants to hit directly behind the ball and through the ball toward the area he is aiming for. A good rule is simply to take the knob of the bat to the ball and lead the swing with the hands, not the barrel of the bat. This action will produce a quicker bat, offer a better chance of reading the pitch before starting the swing, and allow a proper path to the pitch on the outer half of the plate.
In the initial approach to the ball, the barrel of the bat remains higher than the hands, and the hands remain higher than the front elbow.
Straight to the Ball
Obviously, the quickest path between two points is a straight line. In hitting, the two points are the barrel of the bat and the ball. From launch position, the barrel must take a straight path to the ball. It cannot be cast back away from the ball or away from the body. It cannot go down in a curved path to the ball. It must go straight to the path of the ball. To the novice it would seem that this somewhat downward approach to the ball would result in beating the ball into the ground. All we are trying to do is reach the path of the ball quickly. Upon reaching that path, the hitter levels off and follows through.
In the stance, the chin starts above the front shoulder. By the end of the swing, the chin is over the back shoulder. The eyes stay on the ball.
Potential Flaws in Hip Rotation
- Hitter should take care that his bat barrel does not prematurely move away from his body towards the opposite batter’s box. This incorrect action is called “casting” and creates a long, slow swing.
- Hitter should not allow his bat barrel to drop lazily towards the ground, which creates a scoping effect to the swing. This flaw causes the hitter to have a long swing and hit many weak fly balls.
- Hitter should not try to generate bat speed by pulling his front shoulder away from contact of off the ball. This prematurely takes the bat barrel away from contact and out of the hitting zone.
- Hitter should make sure not to waste any time by excessively spinning the front heel towards the back foot during the foot plant.This action can also pull the front knee, front hip and front should off the swing resulting in poor contact with the ball.
Secrets of Good Hip Rotation
- It is acceptable for hitters to initiate the rotation phase of the swing by either accelerating their hips slightly before starting their hands, or they can work at the same time. Some hitters have exceptional hip flexibility and rotate by releasing their hips a split second before their hands. This is fine as long as the hitter’s front shoulder can stay closed to the pitcher when his hips fire. This creates a whipping action of the hitter’s body that brings his hands down and through contact with the baseball with increase barrel speed.
- Due to rotation during the swing, a player cannot literally take the knob of his bat directly to the baseball. However, when a player initiates his swing with this intent, it results in a desired short swing path to the ball. Many great hitters and hitting coaches say that the knob of the bat initially controls the direction of the barrel of the bat to the ball.
Contact
Video: Contact (Winning Baseball) (8 min.) ![]()
Source: Trent Mongero, Winning Baseball
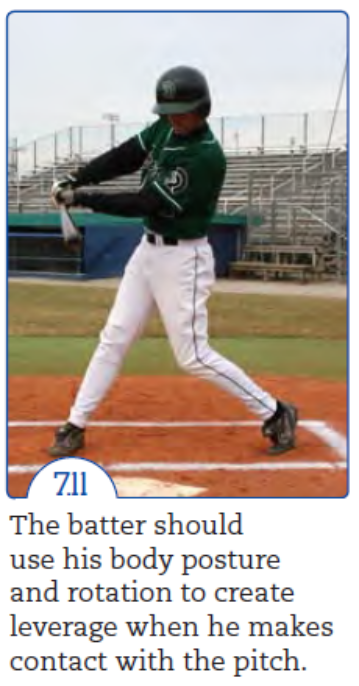
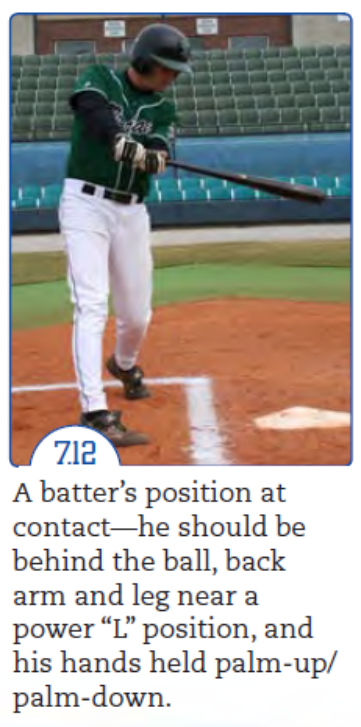
At contact, the hitter’s:
- Head and body should be behind the baseball in order to create maximum leverage.
- Hands should be in a palm up palm down position (i.e., top hand palm facing up, bottom hand palm facing down) to allow for maximum extension through the hitting zone.
- Head should be as still as possible and his eyes should be focused on the ball.
- Back elbow should be near the side of his body and just in front of the back hip, and the back arm should be bent close to an “L” position.
- Front arm should be slightly bent but firm.
- Front knee is slightly bent but it can straighten out at contact with the ball.
- Bat barrel will be below the height of his hands.
- Stride foot should remain mostly closed (i.e., not pointing at pitcher, at 45 degree angle to body) until after contact, and the hitter should be balanced with good posture.
- Back heel should raise off the ground to release the hips into full rotation, and the back leg should also be close to a power “L” position.
Potential Flaws at Contact
- If the player has a long swing, he will tend to swing around the ball, making contact with the outside of the ball. Coaches refer to this as a “hook and pull” hitter. This type of hitter must commit his swing to a pitch earlier than a player who has a short swing path otherwise he has more chance of failure.
- When a hitter has the incorrect perception that he must swing down on the ball all the way to contact, he ends up chopping the ball.
- Another problem is created when the player swings up at the ball or “upper cuts,” trying to lift the ball in the air. Some players have the incorrect perception that this is how they should hit home runs.
- If a batter is fooled by the speed of the pitch, or he is impatient and attempts to take his chest and head to the ball in order to hit it before it gets to the plate, his balance and posture will suffer. In addition, his back elbow will move to a weak position away from his body and too far in front of the back hip, which usually causes the ball to be hit softly.
- A batter should not try to adjust the placement of his stride based on the specific pitch location. The stride should always be straight towards the pitcher. For instance, he may attempt to stride towards the plate on an outside pitch, and step away from the plate on an inside pitch. A batter’s stride foot should be down on the ground well before he knows the exact pitch location, otherwise, he will likely be late executing his swing.
Secrets of Making Good Contact
- Every hitter has “body eyes,” which are his navel and the front of his back knee. At contact with the baseball, a player’s body eyes should directly face the ball.
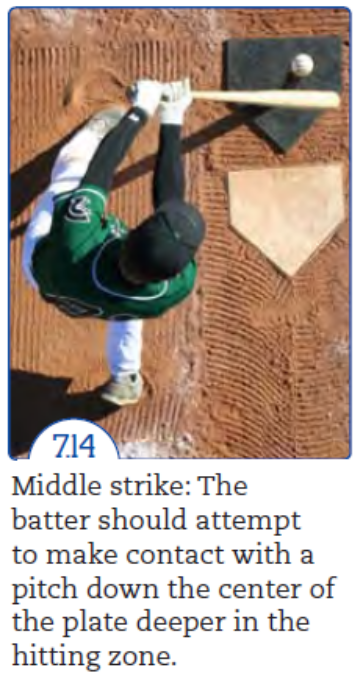
- Each pitch location has an ideal point in the batter’s hitting zone. The inside strike should ideally be hit to the pull side of the field. The middle strike should ideally be hit to the middle of the field. The outside/away strike should ideally be hit to the opposite field. Typically, the hardest pitch location for batters to master is the outer third strike. You need to be patient and allow the ball to come deep into the hitting zone on the outside strikes.


Extension and Finish
Video: Extension and Finish (Winning Baseball) (2 min.) ![]()
Source: Trent Mongero, Winning Baseball
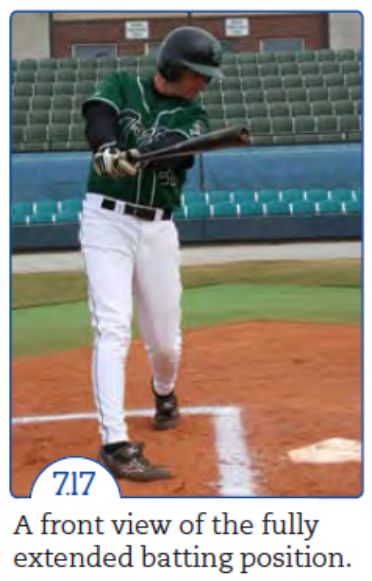
Extension
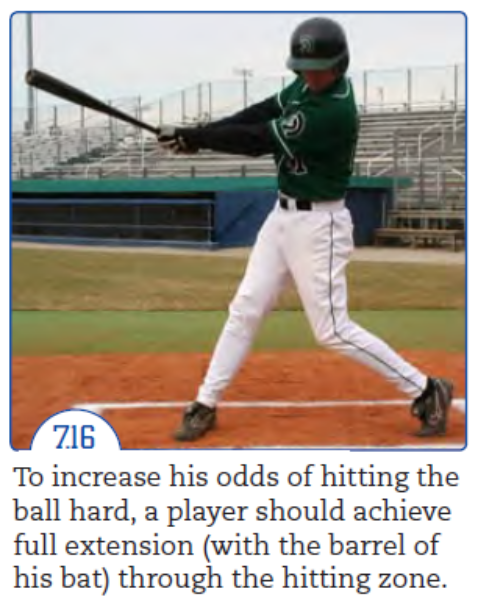
A batter should visualize hitting five baseballs in a line back to back, maintaining his hands in a palm up/palm down relationship. The keeps the bat barrel on the same plane as the ball for a longer period of time. The goal of the hitter’s swing is to be short and quick to the ball, and then to get extension in order to stay through the ball. This desired action of the swing is referred to as “short to and long through.” A hitter who prematurely removes the bat barrel from the hitting zone before achieving full extension of the barrel dramatically decreases the chances of consistently hitting the ball hard.
Potential Flaws at Extension
- When a hitter prematurely turns his top hand over or “rolls” his wrist, it changes the path of the barrel and prematurely removes the bat head from the hitting zone.
Secrets of a Good Extension
- It is beneficial for the batter to keep his head as still as possible through contact and extension of the swing. The more a hitter’s eyes move, the harder it is to track the baseball, recognize the pitch type, and make solid contact with the ball.
- Ideally, a batter should try to hit the ball where it is pitched. This means he pulls an inside pitch, hits a middle pitch up the middle of the field, and hits an outside pitch to the opposite field.
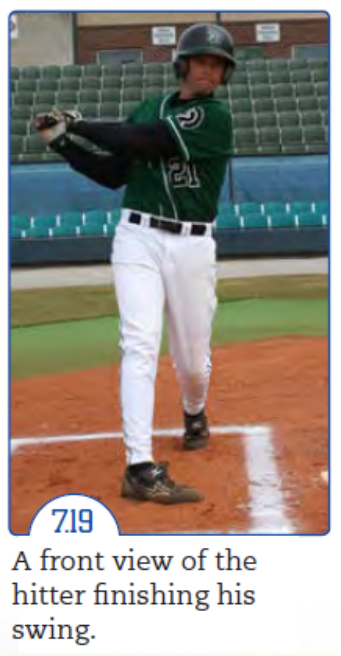
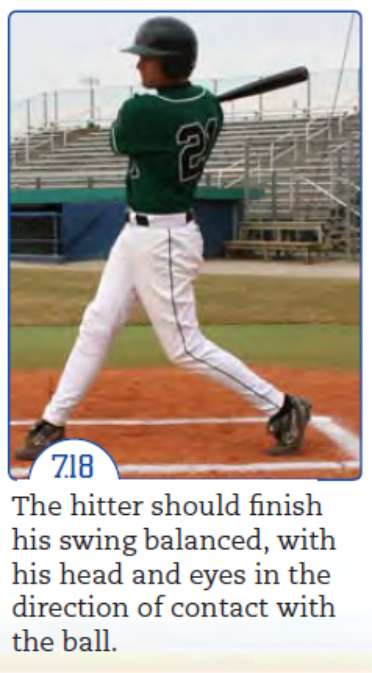
Finish
With the finish, the hitter’s:
- Swing should finish where it started—with balance and good posture.
- Head should be close to perpendicular with his shoulders and his eyes focused on where contact was made with the ball.
- Swing should finish near the height of his front shoulder, which is now facing away from the pitcher. However, the actual height of the finish will vary based on the pitch location. For example, pitches at the top of the strike zone will create a swing finish that will typically be lower than when a pitch come in at the bottom of the strike zone.
- Hands should both remain on the bat rather than removing the top hand.
Potential Flaws with Finish
The batter should avoid rotating too much on his back foot, thereby finishing his swing with poor posture and balance. This is called “over-rotation.”
Secrets of a Good Finish
Some players finish their swing up on the top of their back toe, but others feel more comfortable finishing on the ball of the back foot, and still others actually lift their back foot completely off the ground before bringing it back down after contact. It is really a matter of personal preference.
Visualization and Mental Preparation
The following thoughts may help hitters process the skill information into mental pictures that they can simulate in their swings.
Relax the Body, Focus the Mind
A hitter who grips the bat too tightly and has a rigid body that is tied in knots is often asked to relax. To react properly to a pitched ball, the hitter’s body must be relaxed, but his focus, concentration, and visualization must be sharp. He must understand this point, because when a hitter tries to relax his body, he often relaxes his concentration as well, creating a sloppy swing.
Relaxed Upper Body, Strong Lower Body
As we narrow down the relaxation, we want the hitter’s legs to be firmly planted on the ground, feeling solid and strong. The upper body should be more relaxed and ready to react. The hands will more than likely control the relaxation of the top half. If the hands are tight, the rest of the upper body will be also. Tight muscles are slow muscles.
Quickness, Not Muscle
The hitter should remember this: “If you think strong, you think wrong.” The normal reaction when a pitcher is throwing hard is to swing harder. This, in fact, slows bat speed and normally does not produce base hits. A hitter should concentrate on quickness to the ball. This will normally shorten the path to the ball and will produce a more productive at bat.
Tall, Loud Back Side—Short, Quiet Front Side
As the hitter pictures his swing he imagines the back side driving the front side out of the way. He does not want the front side to pull the back side through, an action that produces a longer, slower swing. In other words, a loud back side produces energy and force, and the quiet front side produces less initial action. In reality, both sides work together. But the front side often opens up too early, the hitter loses plate coverage, and the front shoulder pulls the weight forward, causing a slow, sweeping swing.
The hitter also wants to produce a mental picture of a tall back side. A hitter will often drop his back shoulder below the level of his front shoulder or collapse his back knee, causing the back side to cave in. This causes the hitter to cast the bat away from the direction of the ball initially and will eventually produce a bat arc that is in an upward path. Obviously, this is a longer bat path and breaks the rule of rotating all body parts in the same plane.
React, Don’t Think
This is just another reminder to the hitter that he cannot do much thinking as the pitcher is preparing to throw the ball. He should trust his stuff and simply react to the pitch.
Evaluate Own Talent
Every hitter can control some areas of the strike zone better than he can others. Each hitter should know where his pitch area is in relation to the strike zone. Early in the count he should avoid swinging at strikes that are not in that area.
Evaluate the Pitcher
The hitter can observe the pitcher before his at bat or learn from each pitch that the pitcher throws to him. A pitcher often falls into patterns. What does he throw when ahead or behind in the count? Where does he throw most of his pitches? Does he work the fastballs both in and out?
Some of the questions the hitter can ask himself are “Can he strike me out?” and “Does he have a nasty strikeout pitch?” If the answer is yes, then his thoughts should turn to staying away from the strikeout counts. This may mean being less choosy early in the count. Remember, the object is to get the ball in play! If the hitter decides that the pitcher cannot, in his mind, strike him out, then he can be more patient early in the count.
Evaluate the Situation
Remember that each at bat has different goals. When the infield is playing back with a man on third and less than two outs, the hitter’s goals are different from those he would have when hitting with the bases empty. The batter must hit to the situation and he must know what he wants to do in each at bat.
Be Fearless
To be a good hitter, the player must deal with the fear of being hit by the pitch. It is natural to have fear, but the hitter must uncover and address this fear. The hitter must reach a point where he simply says, I’d rather get hit by the ball than strike out or buckle my knees on a curveball that is approaching me.”
Review the Strike Zone
When the hitter starts to struggle, the strike zone usually appears bigger than it is. The outside corner looks to be almost unreachable. In like manner, the ball also appears smaller. The hitter would do well to re-visualize the strike zone. An effective method is to tape the boundaries of the player’s strike zone on a wall and then stand in front of the wall and visualize and practice his swing at each area of the strike zone.
Work the Count
Simply put, the batter must make the pitcher throw strikes. A walk has a 100 percent on-base average! The hitter should not help the pitcher by swinging at balls out of the strike zone. The success ratio for a hitter over a full season often relates directly to the count when he hits the ball. When pitchers are ahead in the count (1-2, 0-2), the batting average will normally be much lower than when the hitter is ahead in the count (3-1, 2-0).
Sacrifice Bunting
Bunting Winning Baseball (6 min) ![]()
The threat of being able to sacrifice bunt, bunt for a hit, hit and run, slash, or squeeze bunt provides valuable options for a player to help his team win games.
- A sacrifice bunt is a method used by batters to put the ball in the field of play so the base runner(s) can be advanced into scoring position or from second base to third base.
- A properly executed sacrifice bunt does not impact the batting average of the hitter in a negative way.
- Typically, a batter will attempt to sacrifice bunt the ball to the first-base side of the field when a runner is on first base. When runners are on second base or first and second bases, the batter will attempt to sacrifice to the third-base side of the field to provide the best opportunity to successfully advance his teammates.
- When sacrifice bunting, it is critical that the player only attempts to bunt strikes. If the pitch is a ball, the player should simply pull the bat barrel out of the strike zone before the ball arrives.
- Sometimes a player will be asked by his coach to attempt to sacrifice bunt with two strikes when a foul ball will constitute an out.
- The batter should not be concerned about fooling the defence. Thus, he must square around early enough to give himself the time he needs to get into a good bunting position.
- If the defense wants to overly commit to charging, the coach may decide to counteract by implementing a slash bunt.
Steps to Bunt
- Move to front of batter’s box. When a player is asked to sacrifice bunt, he should move to the front of the batter’s box to create more fair territory.
- Turn body to face pitcher. There are various ways a batter can turn his body to get into a bunting position, such as squaring his feet or pivoting. The key is that the player must establish balance and square his chest to face the pitcher, distributing his weight slightly more to his front side.
- Proper plate coverage. He must establish the proper distance from the plate where the barrel will cover the strike zone. This is called “plate coverage.”
- Establish proper bat grip. The batter should establish a proper bunting grip by sliding his top hand up to the balance point of the bat. He should pinch the back of the bat so his fingers are protected from getting hit with the ball. The bottom hand should slide up a few inches off of the knob to provide more bat control. It is the bottom hand that will create the angle with the bat to first or third base.
- Position bat in front of body. Position the bat out in front of his body where his arms are extended but remain slightly flexed. This will help cushion the ball as it impacts the barrel.
- Lower himself behind the bat. The batter will flex his knees and hips to lower himself behind the bat to line up his eyes with the barrel and the pitch. This is referred to as “eye-bat ratio.”
- Start bat at top of strike zone. Make sure bat starts at the top of the strike zone, with the bat’s barrel slightly higher than its knob.
- Bend knees to position bat for lower pitches. The hitter should maintain the upper body alignment, including the position of the head, by simply bending his knees to pitches in the strike zone.
Potential Flaws of Sacrifice Bunts
- Dropping barrel of bat. If a player attempts to bunt by lowering or dropping the barrel of his bat to a low strike, he will put the bat in a bad position. Typically, when the barrel goes down, the ball gets popped up.
- Sliding bottom hand up too high. When a batter slides his bottom hand (knob hand) too high on the bat and positions it next to his top hand, he will destroy the integrity of the bunting grip. A pitch thrown with above-average velocity can then knock the bat barrel backwards due to the lack of stability.
- Turning head diagonally to ground. A batter should never turn his head diagonally to the ground when setting up or executing his sacrifice bunts. His eyes should remain parallel to the ground through his bunting mechanics.
- Stabbing or jabbing the ball. A batter should not attempt to sacrifice bunt by stabbing or jabbing the bat barrel at the pitch. The goal is to soften the ball as it impacts the barrel by maintaining flexion in the elbows and wrists. This acts to naturally deaden the ball on contact.
Secrets with Sacrifice Bunts
- Focus on top half of ball. The batter should focus on the top half of the pitch as it travels to the plate. This will help him hit the bunt down on the ground.
- Pitch is a ball if above the barrel of bat. If the pitch enters the strike zone above the barrel of the bat, it is a ball, and the hitter should not attempt to bunt.
- Start at bottom of strike zone. Some advanced bunters choose to start their sacrifice mechanics at the bottom of the strike zone and rise up to bunt a high strike. They do this because they feel it is easier to adjust in this manner than to start at the top of the strike zone and lower to a position to bunt a low strike. Either way is acceptable.
Sources: Baseball Skills and Drills, American Baseball Coaches Association, Trent Mongero, Winning Baseball
